Jun 30, 2011

Rick Dom WIP 6 + some goodies!

A fun week for Gundam for sure! I got creative block this week on where to take the Rick Dom, and that being the case I grabbed the RG Zaku and started on it. I think this guy will be a straight build and paint. No crazy mods; you know something completely different from my norm. Here he is at about 90% complete.


I also received a shipment from the Gundam Guy! I love that guy. My PG Zeta came in the mail! After some complications in shipping all is well and it is here. Not sure when I will start it, but knowing me and my love of PG's next sounds good.


And here are the WIP pics for what I have done this week. Pla-Plate! and a lot of it. I am working a lot on my symmetry and placement of larger pieces. Its a challenge I am having to do a lot of looking around the Internet for to get ideas on how other great modelers are doing this. I am trying to give this Dom a look as though its been modified for long range space patrols so added thrusters, lightening the armor where it can be and reinforcing it at the vital points. I think I am meeting that goal. At least in my opinion. There is a little clean up to do, but I will prime it and see what sanding is left to do.


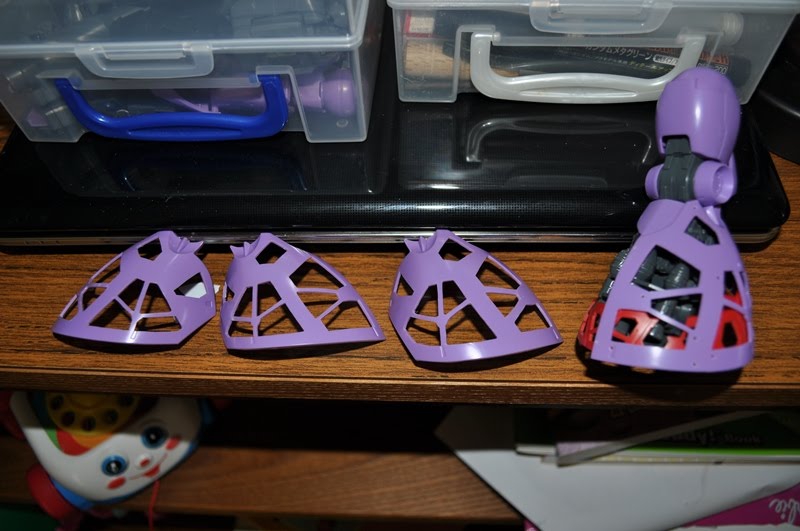
Enjoy the pictures, thanks for stopping by.

Jun 24, 2011

Rick Dom WIP 5

First Congrats to Gundam Guy!!!!! on a healthy baby boy! The world can always use more Gundam/pla lovers!
A while back (a serious while) some one asked me for a tutorial on Miliput, I have not had to use it until this guy, so I haven't been able to meet the request. I can only hope you are still reading my blog. :)
Miliput, is a 2 part putty the can be molded like clay. First step is to cut equal parts of the putties.
Next you knead the two parts together until there are no visible streaks of differing colors, just one uniform color.
Take the appropriate amount in this case a very small amount and roll it into a worm, then lightly work it around or onto what ever it is you are using it for. In the case below I am covering some blemishes, and giving a heavy weld look to the bracing bars for the fuel tanks. I use picks and chisels to get the initial shape, after that I lightly rub it to get rid of the marks. Let it set for about an hour and give it another rub down to perfect the shape even more.

Below you can see I used it as a detail ring on the booster extensions.


That's it, its really easy stuff to work with, just takes a little practice.
Below is the WIP portion, I actually got a lot of work done this week and found a use for a NG kit I had, kit bashing! The extensions are in place with little directional boosters for added flight control.


To give more reason to a huge sword coming out of its head, here is the CDSW (Close Defense Striker Weapon) IE Big sword coming out of the Rick Doms arm.


Kit bashing is fun, I haven't done it since The O build, so this time I am pushing my skill sets for sure with it. Adding a D.R.A.G.O.O.N. system to the Rick Dom giving a long range component to it. First I had to cut the shoulder pieces to fit onto the existing really boring shoulders!


Glue it in place and let that dry.


Then I made some miliput, and started cleaning up and bulking up the shoulder to hold the extra weight.


Here is the snap fitted D.R.A.G.O.O.N. system ready for some detailing and pla plates...just the plating alone is probably going to take 2 weeks!


Got the fuel tanks added to the back skirt also, so now this guy is fueled and ready for flight.


Other sections of the D.R.A.G.O.O.N system will be added around the body. Like I said this is a build for me, I am going all out custom on this guy working on my SB skills and kit bashing for fun. I don't see a need to build something simple this time.


Jun 17, 2011

Rick Dom WIP 4

All right an eventful week to say the least, but I did manage to get some small things done. And a valuable lesson learned. Ronsol lighter fluid will greatly weaken plastic!!! As you can see below the poor leg armor pretty much fell apart. The back story was I put on some pla-plate, I didn't like the end results so I was trying to get the plates off (I used super glue) and the ronsol helped with that, but also caused the plastic to basically fall apart in my hands. Oh well there are extra clear armor pieces so even though the clear plastic is 100 times harder to work with I have spares.
Got the head finished and ready to plate...motivated little cut out here if I do say so myself.
The rear armor skirt is almost done got all the cut outs finished just need to notch out the area for the boosters now.
And being that I was redoing the leg armor, I made an edit to the overall design. As you can see below. This is not going to be the average Rick Dom with a paint job. Its a true custom, Added some fuel cells, once the glue is completely dry I will add the wire and other details.


That's where I am at, not a lot I know, but I had to redo work that was already done. Until next time.

Jun 13, 2011

Rick Dom WIP 3

A small update, but a good one. Started working on the head. The new Gundam Store I found had some nice after market pieces in it. Oh and a Perfect Gundam. How can you pass up the Perfect Gundam? Anyway...
I chopped up a sword and drilled some holes in the head, then stuck her in there reverse sword in the stone style. I then took pieces of the hilt and modified them to fit around it. Here you can see the sword in place.


And below you can see the non-cleaned up version. (there is residue left over from the glue, but a little sanding and primer will cover that right up.) This one of the larger head mods I have done, not done by any means, but I wanted to work on something other than the legs for a little while.


With the mods rolling, I had to extend the rear underskirt thrusters because of some other things I am doing, so a $1.00 pack of pens and a saw took care of those extensions. glue is still setting in the photos.

Thats all I have for now, hope you like it.


Jun 9, 2011

Rick Dom WIP 2

The legs, well the large parts of the legs are done. This is not going to be a fast build for me at all. I am going to be changing a lot of things on this Rick Dom. In finished news, I completed the red under armor pieces, and the outer armor. I also got the feet cut, and backing placed. Now I just need to get my extra pieces and put in some mechanical looking bits. Not too hard, but a first for me. I tend to think things are easier than they end up being. I did find out about a new Gundam Shop, and I am dying to get and see what I can get from there to add to my ridiculous back log. Speaking of back log, I located a Turn A Gundam!!!! The guy that was about to pick it up was shocked when I grabbed it and tossed it in the cart ( I recognized it and didn't need to think about it) So that is now in the back log.

You have already seen the purple pieces, but here all 4 are finished and cleaned up.


Here is the red underskirt loosely attached. Both of them broke while I was cutting away plastic. So I used ProWeld and super glue to make that problem go away.


And here is the underskirt and the outer armor together. I am going to add some screen to the out armor so its not such a clear shot in there, but leaves all the boosters open to be seen.


Here are the feet with Pla Plate in place and drying.


That is the update for now. Small I know, but cutting all those pieces is slow tedious work. I did not want to ruin one. Thanks for stopping by.


Jun 2, 2011

MG Rick Dom WIP 1

Well after 2 builds for others I decided I needed a build for me. The Rick Dom called to me and said something along the lines of The O. Modify me! So I am taking my own challenge. After a lot of searching and shopping, I have located almost all the aftermarket pieces I want, I will have to make the rest. I don't currently have any MG kits to bash, oh well. Took some pics of the steps I have taken to clear out sections of the armor. I have completed the snap build and almost have the lower legs done now. Luckily I remembered to take some pictures before I got too far along. I am still tossing colors and placement around for this one, but needless to say its not going to be a stock scheme ;) For those that don't know how to do this, the way I do it is to drill holes just big enough for my jewelers saw blade to fit into. I cut out sections close to the edge I want leaving a little area to work with. I then take a short blade hobby knife and cut away small pieces until it is almost perfect. finally I use files in a single direction to make everything flat and smooth. Hope it helps if you were wondering.

You can see all the holes after I drilled them I do one larger one after that so I don't cut into the wrong section by accident.


Here you can see the sections cut out prior to the knife and file treatment...no finished pictures of this piece...just decided to cut this one up too.


After all is said and done this is what you have. Much nicer!

And once attached to the leg you get to see all that beautiful armor and detail Bandai put into the frame.


That's where I am at for now. I will post up some more soon.